
You do not need an AWS account to run a trial clone. A self-manage licence however requires an AWS account as this is where the instance will be built. Seahorse offers an account creation service for users if required.
Trial instances are created in our Seahorse / AWS environment
No, the software does not currently allow migration or management of WordPress multisite. Multisite support is part of our development roadmap however and will be delivered later in 2021
Trial instances are active for 36 hours after launch
No, the trial instance is for front-end review only and access to the WordPress admin of the site is restricted
Trial instances are launched on the $10 Lightsail plan. More information on plan types can be found here: https://aws.amazon.com/lightsail/pricing/. On production licenses the initial migration is also launched on the $10 plan but users are free from there to scale up/down as they wish
Create wordpress admin user for debugging
Create IAM Console user for debugging
Trials are restricted to the eu-west-1 (Ireland) region only. Users have the option to select any of the Lightsail regions however when using a production licence
It is not possible to view the management console on trial instances – please see a screen shot of the interface for self-managed users
The software has specific limitations in place to ensure smooth and efficient migrations. Here is an outline of the parameters:
Individual File Size Limit for Zipping: The maximum size for an individual file that can be zipped is 128 MB.
Directory Contents Size Limit for Uploads: The total size of the contents within a directory that can be uploaded is limited to 1000 MB or 1 GB.
Safe Database Size Limit: The recommended maximum size for the entire database is 500 MB. Exceeding this might lead to migration issues or delays.
Safe Database Table Size Limit: The recommended maximum size for an individual database table is 128 MB.
The software has file-size restrictions in place to ensure the clone process completes in under 20 minutes. If your website content exceeds this file-size threshold, this data is isolated for manual transfer (indicative alert shown on Step 3). Please contact us if you are unsure about this and we will help you out.
1. WP XML Method
2. Transferring Media via SFTP
This guide will help you transfer media files between your source site and the cloned version using SFTP (Secure File Transfer Protocol). Since users may operate different SFTP clients, this guide will provide general instructions applicable to most clients.
Steps:
Identify the media directories:
- First, determine which media directories need to be transferred. Make a note of their paths on your source site.
Choose an SFTP client:
- If you don’t already have an SFTP client, download and install one. Examples of popular SFTP clients include FileZilla, WinSCP, and Cyberduck.
Connect to the source site:
- Launch your SFTP client and establish a connection to your source site using the appropriate credentials (hostname, username, password, and port).
Download media directories from the source site:
- Navigate to the media directories you identified in step 1.
- Select all files and directories within the media directories.
- Download the selected files to your local computer. Remember the location where you save them.
Connect to the cloned site:
- If your cloned site has different credentials, establish a new connection in your SFTP client using the cloned site’s credentials.
Upload media directories to the cloned site:
- Navigate to the corresponding destination directories on your cloned site where the media files need to be uploaded.
- Locate the downloaded media files on your local computer.
- Upload the files from your local computer to the destination directories on the cloned site.
Verify the transferred media:
- After the transfer is complete, check the cloned site to ensure that the media files are displayed correctly.
Exporting a Database from PhpMyAdmin
Login to PhpMyAdmin:
- Open PhpMyAdmin in your web browser.
- Enter your username and password to log in.
Select the Database:
- Click on the database you want to export from the left-hand sidebar.
Export the Database:
- Click on the ‘Export’ tab at the top of the page.
- Choose ‘Quick’ for a simple export or ‘Custom’ to customize the export options.
- Select the format, usually ‘SQL’.
- Click ‘Go’ to download the file.
Importing a Database into AWS Lightsail via MySQL Workbench
Create a Lightsail Instance & Database:
- Log in to your AWS account.
- Navigate to AWS Lightsail.
- Create an instance if you don’t already have one.
- Set up MySQL on your instance.
Connect to the Instance using MySQL Workbench:
- Open MySQL Workbench.
- Click on ‘+’ next to MySQL Connections.
- Enter the details for your Lightsail instance. You will need the endpoint, username, and password.
Import the Database:
- Select the database where you want to import the SQL file.
- Click on ‘Server’ in the top menu, then ‘Data Import’.
- Choose ‘Import from Self-Contained File’ and browse to the SQL file you exported from PhpMyAdmin.
- Select the appropriate schema or create a new one.
- Click ‘Start Import’.
Verify the Import:
- Refresh your connection in MySQL Workbench.
- Verify that the tables and data are imported correctly.
Regarding any CORS errors output, this is related to the IP used to serve the temporary instance. Once the source domain is synced after the migration this will no longer be presented.
wp plugin deactivate hello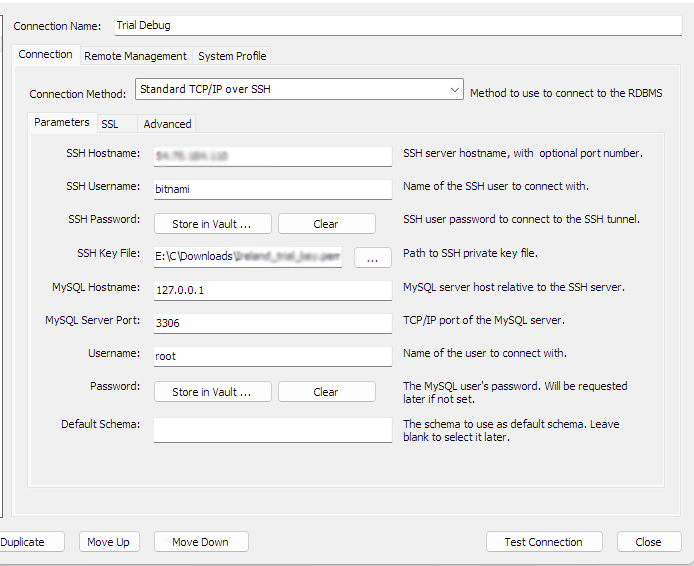
The software has specific limitations in place to ensure smooth and efficient migrations. Please take note of the alerts posted as you may have to take manual actions after the migration process to synchronize your site’s data. Here is an outline of the parameters
Individual File Size Limit for Zipping: The maximum size for an individual file that can be zipped is 128 MB.
Directory Contents Size Limit for Uploads: The total size of the contents within a directory that can be uploaded is limited to 1000 MB or 1 GB.
Safe Database Size Limit: The recommended maximum size for the entire database is 500 MB. Exceeding this might lead to migration issues or delays.
Safe Database Table Size Limit: The recommended maximum size for an individual database table is 128 MB.